
Construction of the generator

Build a tool to wind coils (1)
A coil winder can be made from leftover scraps of wood and bolts. Make life easy and print coilwinder.stl so you have the perfect coil core.
Finish the coil winder with a backplate like shown in the picture.


Wind the first coil
After you’ve turned 90 times, put some hot glue on the outside to prevent unwinding of the coild.
Carefully take the coils out from the coil winder
Repeat this and the previous step until you have 9 identical coils.


Set-up the mould
Print mould.stl 4 times and glue them together with the DCM-glue from the previous steps. After that, grease the mould and fit all 9 coils in it on a equal distance from eachother and with the same side up.
Fill the mould with resin
Pour the polyester resin in the mould until it is full and clamp a thick piece of plywood on top so it doesn’t fold. Remember, we want to keep the stator as thin as possible!


Remove the lid
Let the mould sit for 24h, after that it can be opened again.
Check the result
The end result after removing the mould should look like this.


Connect the coils
Sand off the laquer and solder the wires like shown in the image below.
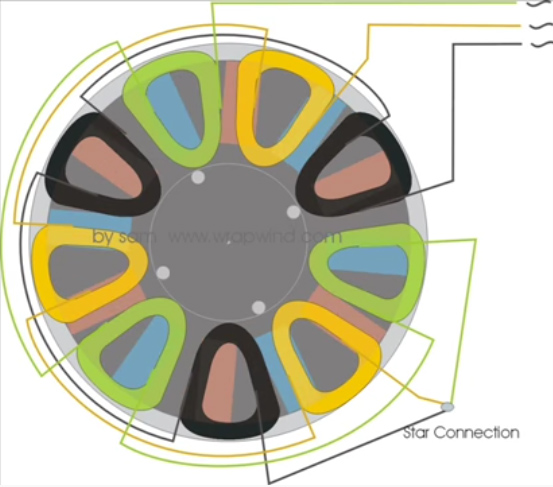
The coils are connected in 3-phase star because this configuration has numerous advantages above single phase or 3-phase delta connection. Each of the 3 phases has again 3 coils that are connected in series and is represented by a orange, black and green in the image.


Add the magnets and iron wire
Put a magnet in every of the 24 gaps. After that, wind the iron wire on the generator until the void is filled.